
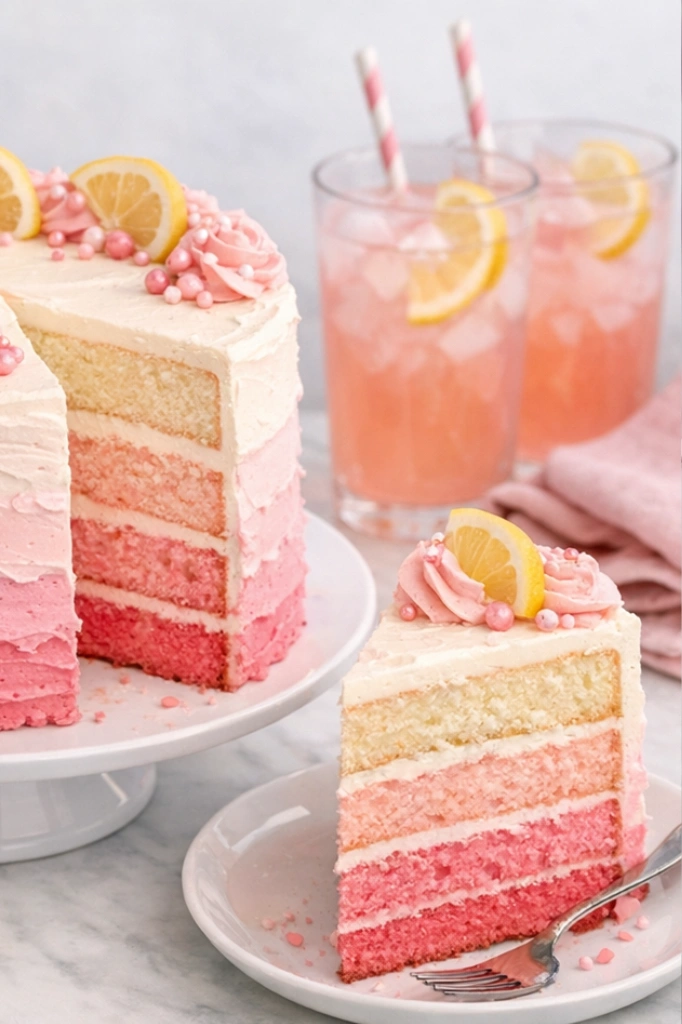
This pink lemonade ombre cake has been on my baking list since last summer, and I finally made it for a birthday gathering and it completely stole the show. The combination of real lemon juice baked right into the sponge, a tangy lemon buttercream filling, and that gorgeous gradient of pink tones layered from pale blush to deep rose is just so satisfying to cut into. It’s a two-component buttercream situation, one for the inside (lemon-forward and tart) and one for the outside decoration (silky, tinted pink).
I know it looks like a project, but the process is pretty straightforward once you have everything prepped. It’s the kind of cake that works for birthdays, bridal showers, or honestly just a Saturday when you want to feel like you actually did something.
The sponge itself is soft and tender from a mix of self-raising and plain flour, and the lemon juice keeps it bright without being overwhelming. Here’s how I make it.
Ingredients
For the Cake
- 200g self-raising flour, sifted
- 150g all-purpose plain flour, sifted
- A pinch of salt
- 200g unsalted butter, softened to room temperature
- 300g caster sugar
- 4 medium eggs, room temperature
- 10ml vanilla extract or vanilla paste
- 200ml fresh lemon juice, room temperature
For the Lemon Buttercream Filling
- 250g salted butter, softened
- 500g icing sugar, sifted
- 20ml fresh lemon juice
- Zest of one lemon
For the Decoration Buttercream
- 250g salted butter, softened
- 500g icing sugar, sifted
- 20ml whole milk
- Pink food colouring paste (I used a rose-pink shade, but any works)
- Sugar pearls, to decorate
How To Make Pink Lemonade Ombre Cake
- Preheat your oven to 170°C (fan) / 190°C (conventional). Grease and line three 6-inch or two 8-inch round cake tins with parchment paper.
- Beat the softened butter and caster sugar together in a stand mixer or with a hand mixer on medium-high speed for 4 to 5 minutes, until the mixture is pale, fluffy, and noticeably increased in volume.
- Add the 4 eggs one at a time, beating well after each addition. Scrape down the sides of the bowl between additions to keep everything evenly mixed.
- Mix in the vanilla extract or paste until just combined.
- Whisk together the self-raising flour, plain flour, and pinch of salt in a separate bowl. Add the flour mixture to the butter mixture in three additions, alternating with the lemon juice. Begin and end with the flour. Fold gently after each addition rather than beating, so the sponge stays light.
- Divide the batter evenly between your prepared tins. If you want an ombre effect inside the cake layers too, add a drop of pink food colouring paste to each portion and vary the intensity (light to deep). Otherwise, bake as is for a plain lemon sponge with coloured buttercream.
- Bake for 25 to 30 minutes, until a skewer inserted in the center comes out clean and the tops are golden. The sponges should spring back when lightly pressed.
- Allow the cakes to cool in their tins for 10 minutes, then turn out onto a wire rack and cool completely before frosting.
- Make the lemon filling buttercream. Beat the salted butter on its own for 3 minutes until pale and fluffy. Add the sifted icing sugar in two additions, mixing on low first to avoid a sugar cloud, then beat on high for 2 minutes. Add the lemon juice and lemon zest and beat for another minute until smooth and spreadable.
- Make the decoration buttercream. Beat the salted butter until pale. Add the sifted icing sugar as above, then mix in the milk. Divide the buttercream into 3 or 4 small bowls and tint each portion a different depth of pink using food colouring paste, from barely blush to a deeper rose.
- Assemble the cake. Place your first layer on a cake board or stand, spread a generous layer of lemon buttercream filling, and repeat with remaining layers. Apply a thin crumb coat of the plain decoration buttercream all over and refrigerate for 20 minutes to set.
- Apply the ombre effect. Starting from the bottom with your darkest pink, use an offset spatula or piping bag to apply bands of each buttercream shade working up toward the top. Use a bench scraper or straight-sided spatula to blend the colors into each other with one smooth swipe around the cake.
- Decorate the top with sugar pearls and any remaining buttercream piped as swirls or rosettes. Refrigerate for at least 30 minutes before slicing.
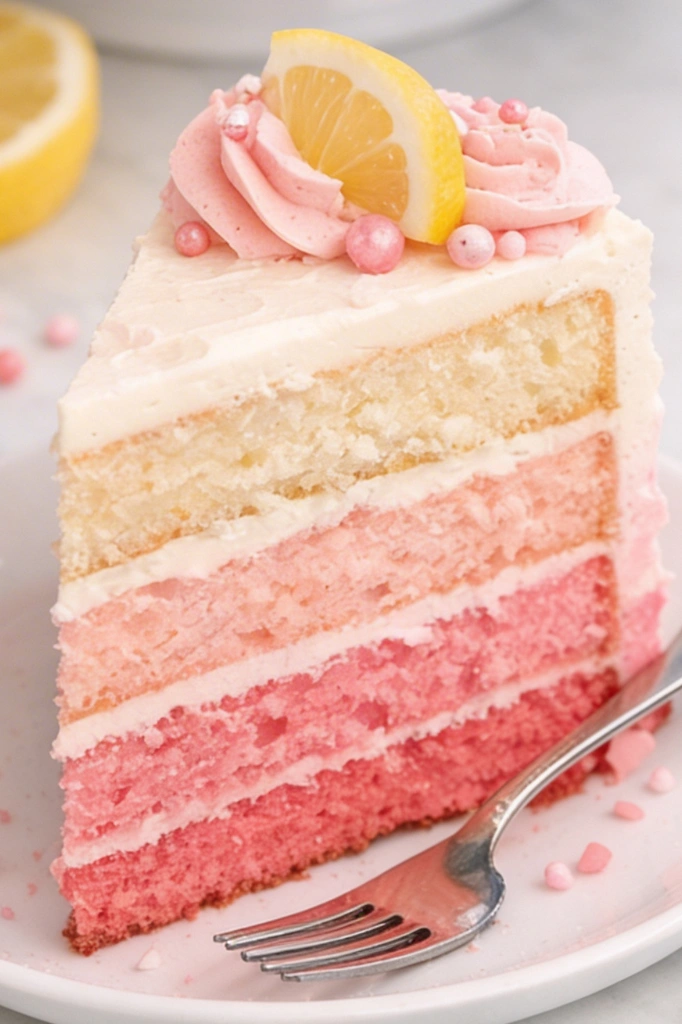
Getting the Ombre Effect Right
The ombre look is easier than it seems, and you don’t need any special tools beyond an offset spatula and a bench scraper. The key is having clearly separated shades of buttercream. I usually make four portions: nearly white (just a tiny drop), pale pink, medium pink, and a deeper rose. Apply them in wide horizontal bands around the chilled crumb-coated cake, then drag the bench scraper around in one go to blend where they meet.
Don’t overthink the blending. One clean pass around the cake gives you that soft, gradual color shift. If you go back and forth too many times, the colors muddy together. A chilled crumb coat underneath makes a huge difference too since the buttercream grips better and doesn’t drag and pull.
For the top, you can leave it smooth or swirl in a mix of pink shades for a more painterly finish. I usually pipe a few rosettes around the edge and scatter sugar pearls while the buttercream is still slightly soft so they stick.
The Lemon Sponge and How It Bakes
Using a mix of self-raising and all-purpose flour is one of those small things that genuinely improves the texture. The self-raising flour gives you lift and a soft, open crumb, while the plain flour adds a little structure so the layers don’t collapse under the weight of all that buttercream. Don’t swap both for just one kind if you can help it.
The 200ml of lemon juice might seem like a lot, but it gets balanced by the 300g of caster sugar, and the baked result is a mellow, fragrant lemon flavor rather than anything puckering. Fresh juice really does make a difference here compared to bottled. I usually need about 4 to 5 lemons.
Make sure your butter and eggs are actually at room temperature before you start. Cold butter won’t cream properly and cold eggs can cause the batter to curdle. Just leave everything out for an hour before you bake.
Making It Ahead and Storing
The sponge layers bake beautifully up to two days ahead. Once fully cooled, wrap each layer tightly in plastic wrap and keep at room temperature. Don’t refrigerate unfrosted sponge layers because they dry out faster in the fridge than at room temperature.
The assembled, frosted cake can be refrigerated for up to 3 days. Take it out of the fridge about an hour before serving so the buttercream softens back to the right texture. Cold buttercream can taste waxy and dense straight from the fridge.
If you want to freeze it, freeze the unfrosted sponge layers individually wrapped for up to 2 months. Defrost at room temperature overnight before assembling.
Notes
- If your eggs and butter are cold, the batter may look curdled when you add the eggs. Add a spoonful of your flour mixture and it’ll come back together.
- For deeper, more saturated pink tones in the buttercream, always use a gel or paste food colouring rather than liquid. Liquid thins the buttercream and the colors stay muted.
- The lemon zest in the filling buttercream is optional but adds a nice pop of fragrance. Use a fine zester so you don’t get any bitter white pith.
- If baking in two 8-inch tins instead of three 6-inch, check at 30 minutes and add up to 10 more minutes if needed.
- Sugar pearls can be swapped for sprinkles, edible glitter, or freeze-dried raspberry pieces for a different look.
- The decoration buttercream is made with milk rather than lemon juice so it stays neutral and white-ish as your base for tinting.
Frequently Asked Questions
Can I make this cake ahead of time?
Yes. The sponge layers can be baked up to 2 days ahead and stored wrapped at room temperature. The fully frosted cake keeps in the fridge for up to 3 days. Let it come to room temperature before serving.
What can I substitute for lemon juice in the cake?
If you want a plain vanilla sponge without the lemon flavor, swap the 200ml lemon juice for 200ml whole milk. The recipe works just as well either way, but you’ll lose the citrus brightness.
Why did my buttercream look too soft to hold the ombre shape?
This usually happens when the kitchen is warm or the butter was too soft to start. Pop the frosted cake in the fridge for 15 to 20 minutes to firm it back up, then do your final smoothing pass with a bench scraper. Working quickly also helps.
Can I freeze the finished cake?
The assembled, frosted cake can be frozen for up to a month. Freeze uncovered until the buttercream is solid, then wrap well in plastic. Defrost overnight in the fridge and bring to room temperature before serving.
How do I get clean, sharp slices when cutting?
Use a long sharp knife dipped in hot water and wiped dry between each cut. Chilling the cake for at least 30 minutes before slicing also helps the layers hold their shape.
Print
Pink Lemonade Ombre Cake
- Total Time: 1 hour 15 minutes
- Yield: 12 servings 1x
- Diet: Vegetarian
Ingredients
For the Cake
- 200g self-raising flour, sifted
- 150g all-purpose plain flour, sifted
- A pinch of salt
- 200g unsalted butter, softened to room temperature
- 300g caster sugar
- 4 medium eggs, room temperature
- 10ml vanilla extract or vanilla paste
- 200ml fresh lemon juice, room temperature
For the Lemon Buttercream Filling
- 250g salted butter, softened
- 500g icing sugar, sifted
- 20ml fresh lemon juice
- Zest of one lemon
For the Decoration Buttercream
- 250g salted butter, softened
- 500g icing sugar, sifted
- 20ml whole milk
- Pink food colouring paste (I used a rose-pink shade, but any works)
- Sugar pearls, to decorate
Instructions
- Preheat your oven to 170°C (fan) / 190°C (conventional). Grease and line three 6-inch or two 8-inch round cake tins with parchment paper.
- Beat the softened butter and caster sugar together in a stand mixer or with a hand mixer on medium-high speed for 4 to 5 minutes, until the mixture is pale, fluffy, and noticeably increased in volume.
- Add the 4 eggs one at a time, beating well after each addition. Scrape down the sides of the bowl between additions to keep everything evenly mixed.
- Mix in the vanilla extract or paste until just combined.
- Whisk together the self-raising flour, plain flour, and pinch of salt in a separate bowl. Add the flour mixture to the butter mixture in three additions, alternating with the lemon juice. Begin and end with the flour. Fold gently after each addition rather than beating, so the sponge stays light.
- Divide the batter evenly between your prepared tins. If you want an ombre effect inside the cake layers too, add a drop of pink food colouring paste to each portion and vary the intensity (light to deep). Otherwise, bake as is for a plain lemon sponge with coloured buttercream.
- Bake for 25 to 30 minutes, until a skewer inserted in the center comes out clean and the tops are golden. The sponges should spring back when lightly pressed.
- Allow the cakes to cool in their tins for 10 minutes, then turn out onto a wire rack and cool completely before frosting.
- Make the lemon filling buttercream. Beat the salted butter on its own for 3 minutes until pale and fluffy. Add the sifted icing sugar in two additions, mixing on low first to avoid a sugar cloud, then beat on high for 2 minutes. Add the lemon juice and lemon zest and beat for another minute until smooth and spreadable.
- Make the decoration buttercream. Beat the salted butter until pale. Add the sifted icing sugar as above, then mix in the milk. Divide the buttercream into 3 or 4 small bowls and tint each portion a different depth of pink using food colouring paste, from barely blush to a deeper rose.
- Assemble the cake. Place your first layer on a cake board or stand, spread a generous layer of lemon buttercream filling, and repeat with remaining layers. Apply a thin crumb coat of the plain decoration buttercream all over and refrigerate for 20 minutes to set.
- Apply the ombre effect. Starting from the bottom with your darkest pink, use an offset spatula or piping bag to apply bands of each buttercream shade working up toward the top. Use a bench scraper or straight-sided spatula to blend the colors into each other with one smooth swipe around the cake.
- Decorate the top with sugar pearls and any remaining buttercream piped as swirls or rosettes. Refrigerate for at least 30 minutes before slicing.
Notes
- If your eggs and butter are cold, the batter may look curdled when you add the eggs. Add a spoonful of your flour mixture and it’ll come back together.
- For deeper, more saturated pink tones in the buttercream, always use a gel or paste food colouring rather than liquid. Liquid thins the buttercream and the colors stay muted.
- The lemon zest in the filling buttercream is optional but adds a nice pop of fragrance. Use a fine zester so you don’t get any bitter white pith.
- If baking in two 8-inch tins instead of three 6-inch, check at 30 minutes and add up to 10 more minutes if needed.
- Sugar pearls can be swapped for sprinkles, edible glitter, or freeze-dried raspberry pieces for a different look.
- The decoration buttercream is made with milk rather than lemon juice so it stays neutral and white-ish as your base for tinting.
- Prep Time: 45 minutes
- Cook Time: 30 minutes
- Category: Dessert
- Method: Baking
- Cuisine: American
Nutrition
- Serving Size: 1 slice
- Calories: 420 kcal
- Sugar: 38 g
- Sodium: 280 mg
- Fat: 10 g
- Saturated Fat: 7 g
- Unsaturated Fat: 7 g
- Trans Fat: 0.3 g
- Carbohydrates: 60 g
- Fiber: 1 g
- Protein: 5 g
- Cholesterol: 75 mg