
Japanese katsu sandwiches have been my go-to weeknight dinner fix whenever I want something that feels a little special without spending hours in the kitchen. That crispy, panko-breaded chicken tucked between pillowy white bread with crunchy cabbage, tonkatsu sauce, and a drizzle of Kewpie mayo is honestly one of those combinations I could eat on repeat.
Ingredients
- 4 x 5oz / 150g Chicken Breasts
- 8 slices of Thick White Bread
- 2 Eggs, beaten
- 1/2 White Cabbage, finely shredded
- 1/4 cup / 30g Plain Flour
- 1 cup / 240ml Vegetable Oil, or as needed
- Tonkatsu Sauce, to taste
- Kewpie Mayo, to taste
- Salt & Black Pepper, as needed
How To Make Japanese Katsu Sandwiches
- Prep the chicken. Place each chicken breast between two sheets of plastic wrap or in a zip-lock bag. Using a rolling pin or meat mallet, pound to an even thickness of about 1/2 inch. Season both sides generously with salt and black pepper.
- Set up your breading station. Line up three shallow bowls: one with plain flour, one with the beaten eggs, and one with panko breadcrumbs (if you have them) or use a thick crumb coating. Season the flour lightly with salt.
- Bread the chicken. Dredge each piece first in the flour, shaking off the excess. Dip into the beaten egg, letting it coat fully. Press into the breadcrumb bowl firmly so the coating sticks on both sides. Set aside on a plate.
- Fry the chicken. Pour vegetable oil into a wide, heavy skillet to about 1/2 inch depth. Heat over medium-high until it shimmers and a breadcrumb dropped in sizzles immediately, around 350°F / 175°C. Fry the chicken for 3 to 4 minutes per side until deeply golden brown and cooked through (internal temp 165°F / 74°C). Transfer to a paper towel-lined plate to drain.
- Shred the cabbage. While the chicken rests for 2 to 3 minutes, finely shred half a white cabbage using a sharp knife or mandoline. The finer the shred, the better the texture in the sandwich.
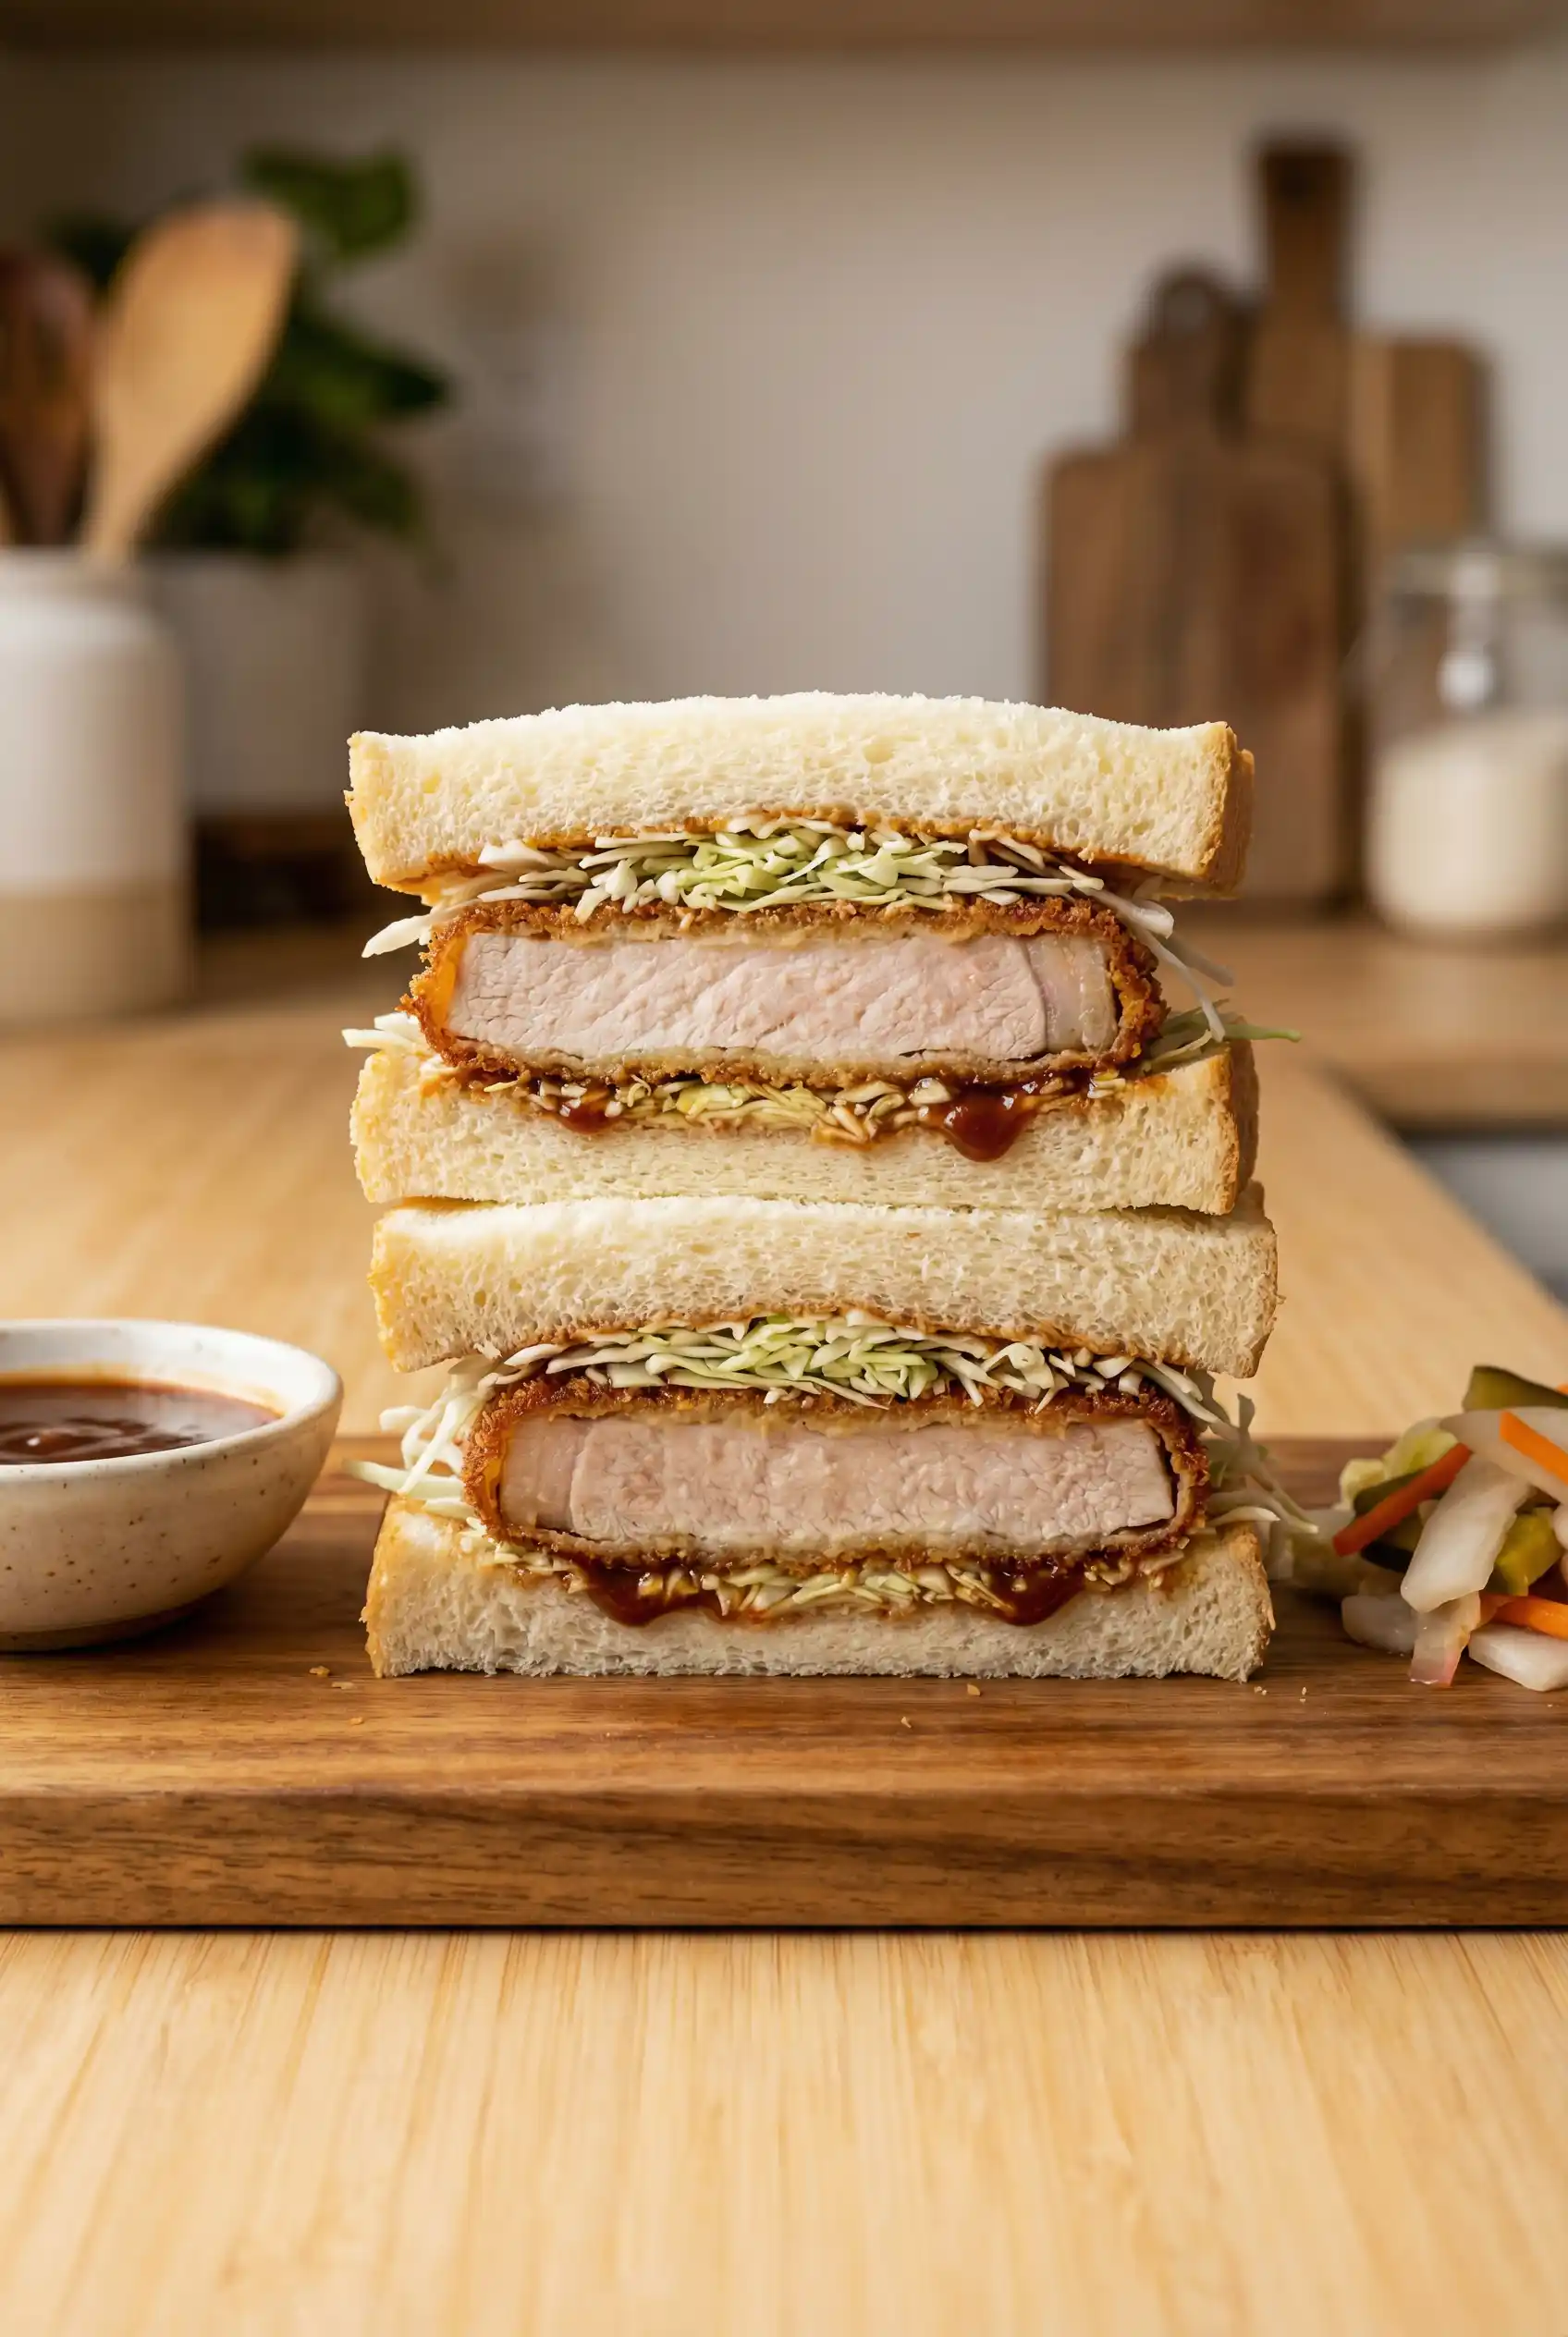
- Slice the katsu. Cut each fried chicken breast into thick diagonal slices so they lay flat on the bread and every bite gets full coverage.
- Build the sandwiches. Spread one slice of thick white bread with a generous layer of Kewpie mayo. Spread the opposite slice with tonkatsu sauce. Layer shredded cabbage on the sauced side, then arrange the sliced katsu on top. Press the two slices together firmly.
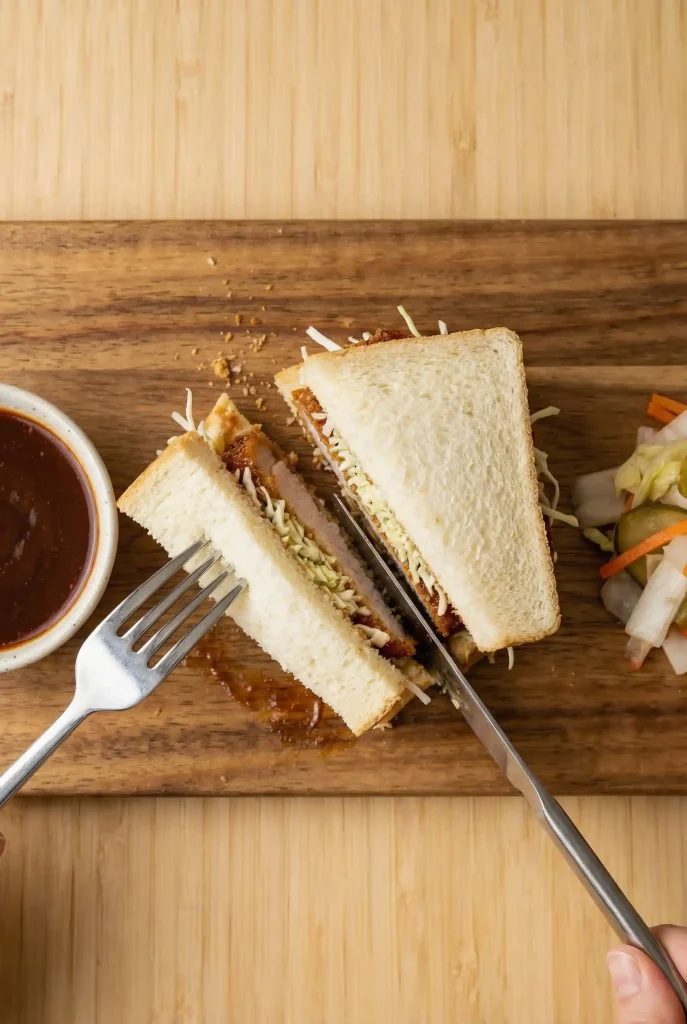
- Trim and serve. For a clean Japanese-style presentation, remove the crusts with a sharp knife and cut each sandwich in half. Serve immediately while the chicken is still warm and crispy.
What Is Tonkatsu Sauce and Can You Make It at Home
Tonkatsu sauce is a thick, slightly sweet Japanese condiment that gets compared to Worcestershire sauce but has more depth and a fruity undertone. It’s traditionally made with a blend of fruits, vegetables, and spices and goes by brand names like Bull-Dog or Otafuku in most Asian grocery stores.
If you can’t find it locally, a quick homemade version works fine: mix ketchup, Worcestershire sauce, soy sauce, a little sugar, and a touch of Dijon mustard. It won’t be identical but gets close enough for a good katsu sandwich. Honestly though, once you find the real thing on a shelf, you’ll want to keep a bottle around at all times.
Choosing the Right Bread for Katsu Sando
The bread makes or breaks a katsu sandwich. In Japan, shokupan (Japanese milk bread) is the standard, and for good reason. It’s soft, slightly sweet, and thick enough to hold everything together without turning soggy. Regular thick-cut white sandwich bread is a solid substitute and easy to find anywhere.
Avoid sourdough or anything with a dense crumb, since it competes with the crunch of the katsu rather than complementing it. The bread should be a soft backdrop, not the star. If you want to go the extra mile, lightly toasting the inside faces before assembly adds a bit of structure and stops the mayo from soaking through.
How to Get the Crispiest Katsu Every Time
The biggest factor is dry chicken. Pat the breasts thoroughly with paper towels before seasoning and breading, because any surface moisture will create steam in the oil and soften the crust. The other thing I always do is let the breaded chicken rest on the plate for 5 minutes before frying so the coating adheres properly.
Oil temperature matters more than most people realize. Too low and the coating absorbs oil and goes greasy. Too high and the outside burns before the chicken cooks through. A thermometer takes the guesswork out completely. Also, don’t overcrowd the pan. Fry one or two pieces at a time and let the oil come back to temperature between batches.
Variations Worth Trying
The classic version uses chicken breast, but pork loin is actually the original katsu protein and gives you a slightly juicier, richer result. Pound it to the same thickness and follow the exact same breading process. Both work equally well in a sandwich.
If you want a lighter option, an air fryer works surprisingly well here. Spray the breaded chicken lightly with oil and cook at 400°F / 200°C for about 12 minutes, flipping halfway. You won’t get quite the same deep golden crust, but it’s a decent weeknight shortcut. For a spicy kick, mix a little sriracha or shichimi togarashi into the Kewpie mayo before spreading.
Serving Ideas
Japanese katsu sandwiches are a complete meal on their own, but a small side of miso soup or a simple cucumber salad rounds things out nicely. For something from the site, the Smashed Cucumber Salad would be a natural fit here since the acidity cuts right through the richness of the fried chicken. The Asian Chilli Garlic Prawns also pair well if you’re doing a larger spread.
For drinks, a cold barley tea or even the Boba Tea from the site keeps things in the same flavor territory.
Pro Tips
- Pound the chicken to an even thickness so it cooks at the same rate throughout, no dry edges or undercooked centers.
- Rest the fried katsu on a wire rack instead of paper towels if you have one. It keeps the bottom crust from steaming and softening.
- Kewpie mayo has egg yolks and a rice vinegar base that regular mayo doesn’t, so it’s worth getting the real thing if you can.
- Make-ahead: you can bread the chicken up to 4 hours ahead and refrigerate it uncovered on a plate. Don’t assemble the full sandwiches until right before serving or the bread gets soggy fast.
- Double the batch and slice leftover katsu over rice with extra tonkatsu sauce for katsu don the next day.
Recipe FAQs
Can I bake the chicken instead of frying it?
Yes. Bake at 425°F / 220°C on a wire rack set over a baking sheet for 20 to 25 minutes, flipping once halfway through. Spray generously with cooking oil so the coating browns properly. It won’t be quite as crispy as pan-frying, but still very good.
How do I store leftovers?
Store the fried chicken separately from the bread and toppings in an airtight container in the fridge for up to 2 days. Reheat in an oven or air fryer at 375°F / 190°C for 8 to 10 minutes to bring the crust back. Assembled sandwiches don’t keep well since the bread goes soft quickly.
What can I substitute for Kewpie mayo?
Regular full-fat mayonnaise works but the flavor is milder and less rich. To get closer to Kewpie, stir in a small splash of rice vinegar and a pinch of sugar per tablespoon of mayo. It’s a small tweak but it does make a difference.
Can I freeze the breaded chicken before frying?
Yes, freeze the breaded raw cutlets on a sheet pan until solid, then transfer to a zip-lock bag. Fry straight from frozen over medium heat, adding an extra 2 to 3 minutes per side. The coating may not be quite as even but it works well for meal prep.
Print
Japanese Katsu Sandwiches
- Total Time: 35 minutes
- Yield: 2 sandwiches (2 servings) 1x
Ingredients
- 4 x 5oz / 150g Chicken Breasts
- 8 slices of Thick White Bread
- 2 Eggs, beaten
- 1/2 White Cabbage, finely shredded
- 1/4 cup / 30g Plain Flour
- 1 cup / 240ml Vegetable Oil, or as needed
- Tonkatsu Sauce, to taste
- Kewpie Mayo, to taste
- Salt & Black Pepper, as needed
Instructions
- Prep the chicken. Place each chicken breast between two sheets of plastic wrap or in a zip-lock bag. Using a rolling pin or meat mallet, pound to an even thickness of about 1/2 inch. Season both sides generously with salt and black pepper.
- Set up your breading station. Line up three shallow bowls: one with plain flour, one with the beaten eggs, and one with panko breadcrumbs (if you have them) or use a thick crumb coating. Season the flour lightly with salt.
- Bread the chicken. Dredge each piece first in the flour, shaking off the excess. Dip into the beaten egg, letting it coat fully. Press into the breadcrumb bowl firmly so the coating sticks on both sides. Set aside on a plate.
- Fry the chicken. Pour vegetable oil into a wide, heavy skillet to about 1/2 inch depth. Heat over medium-high until it shimmers and a breadcrumb dropped in sizzles immediately, around 350°F / 175°C. Fry the chicken for 3 to 4 minutes per side until deeply golden brown and cooked through (internal temp 165°F / 74°C). Transfer to a paper towel-lined plate to drain.
- Shred the cabbage. While the chicken rests for 2 to 3 minutes, finely shred half a white cabbage using a sharp knife or mandoline. The finer the shred, the better the texture in the sandwich.
- Slice the katsu. Cut each fried chicken breast into thick diagonal slices so they lay flat on the bread and every bite gets full coverage.
- Build the sandwiches. Spread one slice of thick white bread with a generous layer of Kewpie mayo. Spread the opposite slice with tonkatsu sauce. Layer shredded cabbage on the sauced side, then arrange the sliced katsu on top. Press the two slices together firmly.
- Trim and serve. For a clean Japanese-style presentation, remove the crusts with a sharp knife and cut each sandwich in half. Serve immediately while the chicken is still warm and crispy.
Notes
- Pound the chicken to an even thickness so it cooks at the same rate throughout, no dry edges or undercooked centers.
- Rest the fried katsu on a wire rack instead of paper towels if you have one. It keeps the bottom crust from steaming and softening.
- Kewpie mayo has egg yolks and a rice vinegar base that regular mayo doesn’t, so it’s worth getting the real thing if you can.
- Make-ahead: you can bread the chicken up to 4 hours ahead and refrigerate it uncovered on a plate. Don’t assemble the full sandwiches until right before serving or the bread gets soggy fast.
- Double the batch and slice leftover katsu over rice with extra tonkatsu sauce for katsu don the next day.
- Prep Time: 20 minutes
- Cook Time: 15 minutes
- Category: Sandwich
- Method: Frying
- Cuisine: Japanese
Nutrition
- Serving Size: 1 sandwich
- Calories: 650 kcal
- Sugar: 8 g
- Sodium: 900 mg
- Fat: 30 g
- Saturated Fat: 8 g
- Unsaturated Fat: 20 g
- Trans Fat: 0.5 g
- Carbohydrates: 55 g
- Fiber: 3 g
- Protein: 35 g
- Cholesterol: 95 mg