

Basque cheesecake is this amazing dessert I make when I want to impress my friends without spending hours in the kitchen. You could say it’s one of the easiest fancy desserts to bake. It has this burnt top that makes it look like you messed up, but that’s actually how it should be! We love this cheesecake in my home because it’s creamy inside and crispy outside. I think you will like this recipe too, as it’s hard to get wrong.
Table of Contents
What is Basque Cheesecake?
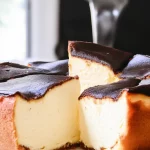
Basque cheesecake comes from San Sebastián in the Basque region of Spain. I first tried it after seeing photos online and was shocked by how different it looks from traditional cheesecake. This unique dessert has a burnt, caramelized top and a creamy, almost custard-like center. It’s baked at a high temperature, which creates that signature burnt exterior while keeping the inside soft and creamy.
Unlike other cheesecakes, Basque cheesecake has no crust and doesn’t need a water bath. It’s meant to crack and sink in the middle as it cools – that’s part of its rustic charm! The dessert was created in the 1990s at La Viña restaurant in San Sebastián, and now people all over the world make this simple but impressive treat.
Basque Cheesecake Ingredients
- 2 pounds (four 8oz blocks) full fat cream cheese, room temperature – This is the star of the show. I always use full-fat cream cheese because it gives the richest flavor and creamiest texture.
- 1 1/2 cups (300g) granulated sugar – This sweetens the cheesecake and helps create that caramelized top.
- 5 large eggs, room temperature – These give structure and richness. Room temperature eggs blend better with the batter.
- 1 tsp vanilla extract – For that subtle flavor boost that makes everything better.
- 1 3/4 cups (420g) heavy cream – This creates that silky, luxurious texture that makes Basque cheesecake special.
- 1 tsp salt – I never skip this! Salt enhances all the flavors and balances the sweetness.
- 1/4 cup (33g) all-purpose flour – Just a touch of flour helps stabilize the cheesecake.
How to Make Basque Cheesecake
- First, I preheat my oven to 400°F (200°C). This high temperature is essential for getting that characteristic burnt top.
- I prepare a 9-inch springform pan by buttering the inside generously. Then I press two layers of parchment paper into the bottom and up the sides. I make sure the paper extends about 2 inches above the edge of the pan. This might look messy with wrinkles in the paper, but that’s part of the charm!
- In a large bowl or stand mixer with the paddle attachment, I cream together the cream cheese and sugar on medium-low speed until smooth. I don’t whip it too much – I just want it combined without adding too much air.
- Next, I add the eggs one at a time on low speed, making sure each is incorporated before adding the next. Then I mix in the vanilla extract.
- With the mixer still on low, I pour in the heavy cream in a slow, steady stream until the mixture looks smooth and silky.
- Last for the batter, I sift in the flour and salt, then gently fold them in with a spatula until just combined. The batter will be quite liquid – that’s normal!
- I pour the batter into my prepared pan and give it a few gentle taps on the counter to release any air bubbles.
- The cheesecake goes into the preheated oven for 60-65 minutes. I know it’s done when the top is completely burnt (yes, really!) and the center still has a slight jiggle when I gently shake the pan.
- After baking, I let it cool to room temperature for about an hour. Then I can either serve it right away or refrigerate it for a couple hours to let it set completely. I usually prefer the chilled version, but both ways are delicious!
What is the difference between Basque cheesecake and regular cheesecake?
The differences between Basque cheesecake and regular cheesecake are pretty big! I notice these main distinctions when I make them:
Traditional cheesecake usually has a graham cracker or cookie crust, while Basque cheesecake has no crust at all. Regular cheesecake is baked slowly at a lower temperature, often in a water bath to prevent cracking and browning. Basque cheesecake, on the other hand, is baked at a high temperature specifically to create that burnt, caramelized exterior.
The texture is different too. Regular cheesecake is dense and firm, while Basque cheesecake has a creamier, almost custard-like center that gets firmer as it cools. The flavor profile also differs – Basque cheesecake has those caramelized, almost bitter notes from the burnt top that balance the sweetness of the filling.
Another big difference is the appearance. Traditional cheesecake aims for a perfect, crack-free surface, while Basque cheesecake embraces its rustic look with a cracked, burnt top and wrinkled parchment paper sides.
Tips for Success
These tips help me get great results every time I make Basque cheesecake:
- Room temperature ingredients are crucial! Cold cream cheese will leave lumps in your batter.
- Don’t overmix the batter. Mix just until ingredients are combined to avoid adding too much air.
- The parchment paper should extend above the pan edges. This helps contain the batter as it rises during baking and gives the cheesecake its rustic look.
- Trust the process – the top is supposed to get very dark, almost burnt. This creates that signature flavor.
- The center should still jiggle slightly when you take it out of the oven. It will continue to set as it cools.
- Let the cheesecake cool completely before removing from the pan to avoid it falling apart.
- A clean, sharp knife dipped in hot water makes cutting cleaner slices.
How to Store Basque Cheesecake
I store my Basque cheesecake in the refrigerator, covered loosely with the parchment paper it baked in or with plastic wrap. It keeps well for up to 5 days, though it’s usually gone within 2 days in my house!
The flavor actually improves after the first day, as the caramelized notes mellow and blend with the creamy filling. I like to take it out of the refrigerator about 20-30 minutes before serving to take the chill off.
If you want to make individual servings, you can slice the cheesecake and wrap each piece separately. This makes it easy to grab a slice whenever the craving hits!
How to Freeze Basque Cheesecake the Right Way
Yes, you can freeze Basque cheesecake! I do this when I want to prepare ahead for a party or save leftovers. Here’s how I do it:
- I let the cheesecake cool completely first.
- Then I slice it into individual portions (this makes thawing easier and quicker).
- I wrap each slice tightly in plastic wrap, then add a layer of aluminum foil.
- I place the wrapped slices in a freezer-safe container or bag, then label with the date.
Frozen Basque cheesecake stays good for up to 3 months. When I want to enjoy a slice, I transfer it to the refrigerator and let it thaw overnight. You can also thaw it at room temperature for about 2-3 hours.
I don’t recommend freezing the entire cheesecake, as it takes longer to thaw and the texture might not be as perfect.
Recipe FAQ’s
Can I use light cream cheese instead of full-fat?
I don’t recommend it. Full-fat cream cheese gives the best flavor and texture. Light cream cheese has more water content and can make your cheesecake less creamy.
Why did my cheesecake crack too much?
Some cracking is normal and part of the charm! But if it cracked excessively, your oven might be running too hot. Try reducing the temperature slightly next time.
Can I add lemon juice or zest to this recipe?
Yes! I sometimes add 1 tablespoon of lemon zest for a citrusy twist. Just fold it in with the flour.
How do I know when it’s done?
The top should be dark brown, almost burnt looking, and the center should still have a slight jiggle when you gently shake the pan.
Can I make a smaller version?
Yes, you can halve the recipe and use a 6-inch pan. Reduce the baking time to about 45-50 minutes.
Why is my cheesecake too jiggly in the middle?
If it seems too loose after cooling completely, it might need more baking time. Next time, leave it in the oven for 5-10 minutes longer.
Does it need to be refrigerated?
Yes, after it cools to room temperature, it should be refrigerated for food safety. Plus, I think it tastes even better cold!
Basque Cheesecake
- Total Time: 1 hour 15 minutes
- Yield: 8 servings 1x
- Diet: Vegetarian
Ingredients
- 2 pounds (four 8oz blocks) full fat cream cheese, room temperature – This is the star of the show. I always use full-fat cream cheese because it gives the richest flavor and creamiest texture.
- 1 1/2 cups (300g) granulated sugar – This sweetens the cheesecake and helps create that caramelized top.
- 5 large eggs, room temperature – These give structure and richness. Room temperature eggs blend better with the batter.
- 1 tsp vanilla extract – For that subtle flavor boost that makes everything better.
- 1 3/4 cups (420g) heavy cream – This creates that silky, luxurious texture that makes Basque cheesecake special.
- 1 tsp salt – I never skip this! Salt enhances all the flavors and balances the sweetness.
- 1/4 cup (33g) all-purpose flour – Just a touch of flour helps stabilize the cheesecake.
Instructions
- First, I preheat my oven to 400°F (200°C). This high temperature is essential for getting that characteristic burnt top.
- I prepare a 9-inch springform pan by buttering the inside generously. Then I press two layers of parchment paper into the bottom and up the sides. I make sure the paper extends about 2 inches above the edge of the pan. This might look messy with wrinkles in the paper, but that’s part of the charm!
- In a large bowl or stand mixer with the paddle attachment, I cream together the cream cheese and sugar on medium-low speed until smooth. I don’t whip it too much – I just want it combined without adding too much air.
- Next, I add the eggs one at a time on low speed, making sure each is incorporated before adding the next. Then I mix in the vanilla extract.
- With the mixer still on low, I pour in the heavy cream in a slow, steady stream until the mixture looks smooth and silky.
- Last for the batter, I sift in the flour and salt, then gently fold them in with a spatula until just combined. The batter will be quite liquid – that’s normal!
- I pour the batter into my prepared pan and give it a few gentle taps on the counter to release any air bubbles.
- The cheesecake goes into the preheated oven for 60-65 minutes. I know it’s done when the top is completely burnt (yes, really!) and the center still has a slight jiggle when I gently shake the pan.
- After baking, I let it cool to room temperature for about an hour. Then I can either serve it right away or refrigerate it for a couple hours to let it set completely. I usually prefer the chilled version, but both ways are delicious!
Notes
- Room temperature ingredients are crucial! Cold cream cheese will leave lumps in your batter.
- Don’t overmix the batter. Mix just until ingredients are combined to avoid adding too much air.
- The parchment paper should extend above the pan edges. This helps contain the batter as it rises during baking and gives the cheesecake its rustic look.
- Trust the process – the top is supposed to get very dark, almost burnt. This creates that signature flavor.
- The center should still jiggle slightly when you take it out of the oven. It will continue to set as it cools.
- Let the cheesecake cool completely before removing from the pan to avoid it falling apart.
- A clean, sharp knife dipped in hot water makes cutting cleaner slices.
- Prep Time: 15 minutes
- Cook Time: 60 minutes
- Category: Dessert
- Method: Baking
- Cuisine: Spanish
Nutrition
- Serving Size: 1 slice
- Calories: 430 kcal
- Sugar: 21 g
- Sodium: 280 mg
- Fat: 35 g
- Saturated Fat: 20 g
- Unsaturated Fat: 13 g
- Trans Fat: 0.5 g
- Carbohydrates: 25 g
- Fiber: 0.3 g
- Protein: 7 g
- Cholesterol: 170 mg