Ingredients
For the BBQ chicken:
- 1½ pounds boneless, skinless chicken thighs (or breasts if you prefer)
- 1 tablespoon olive oil
- 1 teaspoon garlic powder
- 1 teaspoon onion powder
- 1 teaspoon smoked paprika
- ½ teaspoon salt
- ¼ teaspoon black pepper
- ¾ cup BBQ sauce (your favorite brand or homemade)
For the rice:
- 2 cups uncooked white rice (I like jasmine or basmati)
- 4 cups water or chicken broth
- 1 teaspoon salt (if using water)
For the toppings:
- 1 cup corn kernels (fresh, frozen and thawed, or canned)
- 1 cup black beans, rinsed and drained
- 1 cup diced tomatoes
- 1 avocado, diced
- ½ red onion, finely diced
- 1 jalapeño, seeds removed and finely diced (optional)
- ½ cup shredded cheddar or Monterey Jack cheese
- ¼ cup chopped fresh cilantro
- 2 green onions, thinly sliced
- Lime wedges for serving
- Extra BBQ sauce for drizzling
Instructions
- First, I start cooking the rice according to package directions. For white rice, I generally use a 1:2 ratio of rice to liquid. I bring the water or broth and salt to a boil, add the rice, cover, reduce heat to low, and simmer for about 15-20 minutes until all the liquid is absorbed. Then I remove it from heat and let it sit, covered, for another 5 minutes before fluffing with a fork.
- While the rice is cooking, I prep the chicken. I mix the garlic powder, onion powder, smoked paprika, salt, and pepper in a small bowl, then sprinkle the mixture evenly over both sides of the chicken thighs.
- I heat the olive oil in a large skillet over medium-high heat. When it’s hot, I add the seasoned chicken and cook for about 5-6 minutes on each side until nicely browned and cooked through (internal temperature should reach 165°F).
- Once the chicken is cooked, I remove the skillet from heat and pour in about half the BBQ sauce, turning the chicken to coat it well. I let it sit for a minute to soak up the sauce.
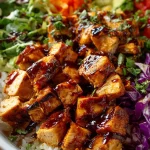
- Next, I transfer the chicken to a cutting board and let it rest for a few minutes before slicing it into strips or chunks. After slicing, I toss the chicken pieces with the remaining BBQ sauce to make sure every bite is coated with that sweet, tangy goodness.
- Now comes the fun part – assembling the bowls! I start with a base of the fluffy rice, then add a portion of the BBQ chicken on top.
- I arrange the toppings around the chicken: corn, black beans, diced tomatoes, avocado, red onion, and jalapeño (if using).
- To finish, I sprinkle each bowl with shredded cheese, fresh cilantro, and sliced green onions. I add a lime wedge on the side for squeezing over the top right before eating, and sometimes drizzle on a little extra BBQ sauce.
- Then it’s time to dig in and enjoy all those amazing flavors and textures in each bite of my BBQ chicken rice bowls!
Notes
After making these BBQ chicken rice bowls countless times, I’ve picked up some tricks along the way! For the juiciest chicken, I try not to overcook it – chicken thighs are more forgiving than breasts, but either way, using a meat thermometer helps me get it just right (165°F is the magic number).
The BBQ sauce you choose makes a big difference in the final flavor. I switch between brands depending on my mood – sometimes I want something smoky and spicy, other times sweet and tangy. If you’re using a thick BBQ sauce, you might want to thin it out with a tablespoon or two of water to help it coat the chicken better.
To save time, I often cook a big batch of rice on the weekend and freeze portions to use throughout the week. This cuts about 20 minutes off my prep time for these bowls. Another time-saver is using pre-chopped veggies from the grocery store salad bar.
For meal prep, I keep the components separate and assemble just before eating. The avocado is the trickiest part since it browns quickly – I either add it fresh right before eating or sprinkle it with a bit of lime juice to help it stay green longer.
- Prep Time: 15 minutes
- Cook Time: 20 minutes
- Category: Main Course
- Method: Pan-Searing
- Cuisine: American
Nutrition
- Serving Size: 1 bowl
- Calories: 500 kcal
- Sugar: 14 g
- Sodium: 800 mg
- Fat: 18 g
- Saturated Fat: 4 g
- Unsaturated Fat: 12 g
- Trans Fat: 0 g
- Carbohydrates: 50 g
- Fiber: 5 g
- Protein: 35 g
- Cholesterol: 90 mg