
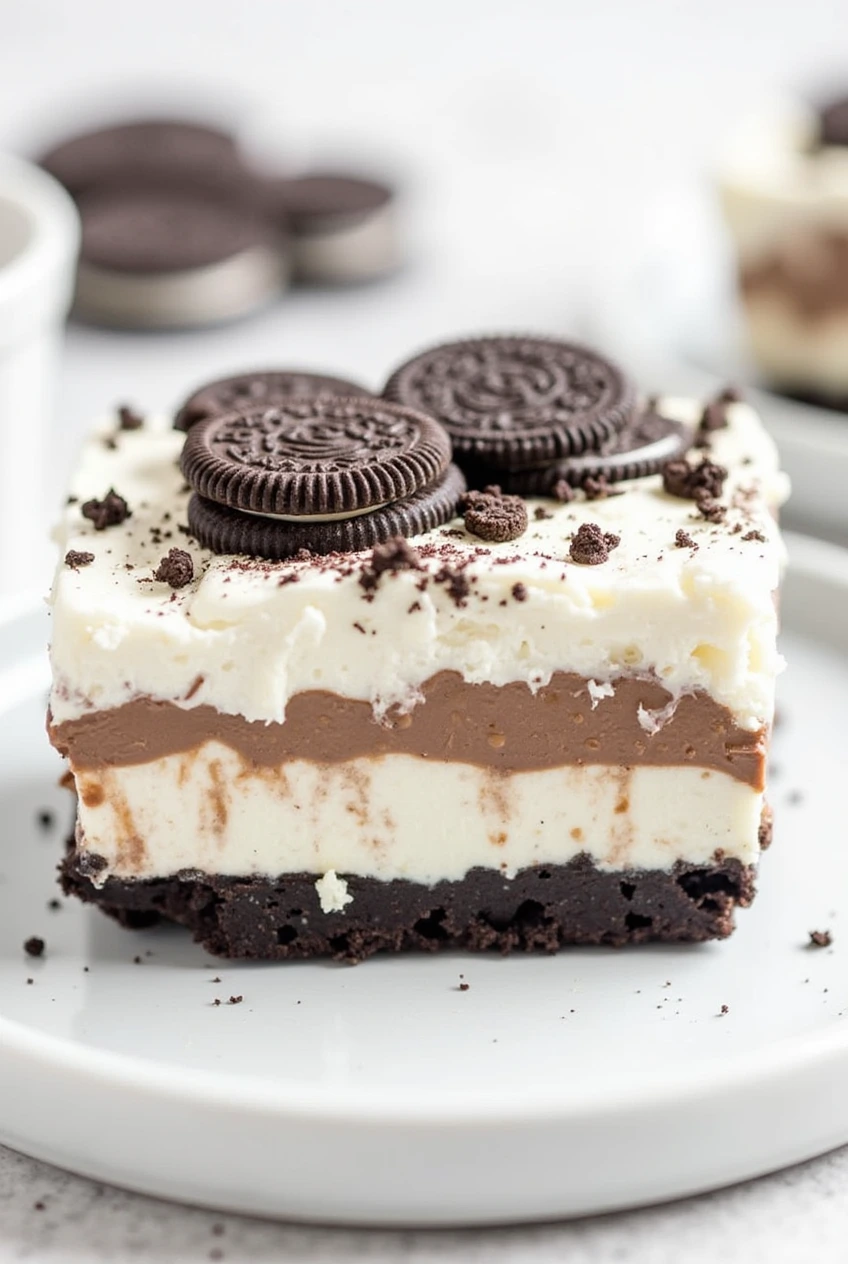
The Oreo Delight always comes to mind. It’s a no-bake treat that combines the rich, chocolatey flavor of Oreos with creamy layers of pudding and Cool Whip. This dessert has become my go-to for potlucks, family gatherings, or even lazy Sunday afternoons when I want something sweet but don’t feel like turning on the oven. If you’re looking for a show-stopping dessert that requires minimal effort, this Oreo Delight is sure to impress.
Why You’ll Love This Oreo Delight
There are so many reasons why this Oreo Delight stands out:
- No-Bake Convenience: Who doesn’t love a dessert that doesn’t require an oven? It’s perfect for summer parties or anytime you want to avoid heating up your kitchen.
- Rich Flavor Profile: The combination of crushed Oreos, cream cheese, pudding, and Cool Whip creates a decadent experience in every bite.
- Easy Prep: With just a few simple steps, you can have this dessert ready in no time. Plus, it’s fun to assemble!
- Customizable: Feel free to tweak the recipe to suit your preferences add-ins like chopped nuts or drizzled caramel sauce take it to the next level.
Have you ever tried making a layered dessert before? If not, this Oreo Delight will be a delightful introduction.
Recipe Ingredients
Here’s what you’ll need to create this heavenly dessert:
- 50 Oreo cookies: These form the base and add a delicious crunch throughout the dish.
- ½ cup unsalted butter (melted): Adds richness and helps bind the cookie crumbs together.
- 1 250 g package cream cheese (softened to room temperature): Creates a smooth, velvety layer that complements the chocolate perfectly.
- 1 cup confectioners’ sugar: Sweetens the cream cheese mixture without overpowering the other flavors.
- 2 tubs Cool Whip: Provides lightness and airiness to balance the heavier components.
- 2 packages instant chocolate pudding (4-serving packs): Brings depth and a hint of cocoa to the mix.
- 2 ½ cups 2% milk: Used to prepare the pudding and adds moisture to the layers.
These ingredients come together effortlessly to create a dessert that’s as impressive as it is satisfying.
How To Make Oreo Delight
- Prepare Your Baking Dish: Begin by lining a 9” x 13” baking dish with parchment paper for easy removal later.
- Crush the Oreos: Use a food processor to finely crush 50 Oreo cookies until they resemble coarse sand. Reserve ¾ cup of these crumbs for topping.
- Make the Crust: In a mixing bowl, combine the remaining crushed Oreos with melted butter. Stir well until all the crumbs are evenly coated. Press this mixture firmly into the bottom of the prepared dish. Place the crust in the freezer for a few minutes while you work on the next step.
- Cream Cheese Layer: Beat softened cream cheese and confectioners’ sugar together until smooth. Fold in one tub of Cool Whip gently, being careful not to overmix. Spread this mixture evenly over the chilled Oreo crust. To prevent disturbing the crust, drop spoonfuls of the cream cheese mixture onto the base and spread carefully.
- Pudding Layer: In a separate bowl, whisk together the milk and instant chocolate pudding mixes. Beat for about 2 minutes until thickened. Spread this layer evenly over the cream cheese mixture.
- Final Touches: Top the pudding layer with the second tub of Cool Whip, spreading it smoothly. Sprinkle the reserved Oreo crumbs over the top for added texture and presentation.
- Chill and Serve: Refrigerate the dessert for at least 6 hours or overnight to allow the flavors to meld together. Once set, slice into squares and enjoy!
Expert Tips and Tricks
To ensure your Oreo Delight turns out perfectly every time, here are some expert tips:
- Room Temperature Cream Cheese: Softened cream cheese blends more easily and results in a smoother texture. Let it sit out for about 30 minutes before starting.
- Don’t Overmix: When incorporating Cool Whip into the cream cheese mixture, fold gently to maintain its fluffiness. Overmixing can deflate the volume.
- Freeze the Crust: A quick stint in the freezer helps solidify the crust, preventing it from becoming soggy once the wet layers are added.
- Even Layers: Take your time spreading each layer to ensure they’re uniform, which makes cutting cleaner and more visually appealing.
What step do you think might be trickiest? Don’t worry we’ll cover troubleshooting later!
Recipe Variations & Possible Substitutions
This recipe is versatile, so feel free to experiment based on your preferences:
- Cookie Choices: Swap regular Oreos for different varieties like peanut butter or mint chocolate chip for unique twists.
- Dairy-Free Option: Use dairy-free cream cheese and whipped topping alternatives if needed. Coconut milk-based puddings also work well.
- Add-Ins: Fold in chopped nuts, mini chocolate chips, or caramel drizzle for extra flavor and texture.
- Layer Changes: Experiment with vanilla or banana pudding instead of chocolate for a lighter option.
Which variation sounds most appealing to you? Try one and let us know how it turns out!
Serving and Pairing Suggestions
This Oreo Delight shines as a standalone dessert, but pairing it with complementary treats takes it to the next level:
- Beverages: Serve with a cold glass of milk or hot coffee for a classic combo.
- Fruit Pairings: Add fresh berries or sliced bananas alongside for a refreshing contrast.
- Ice Cream Combo: Scoop vanilla ice cream on top for an extra indulgent treat.
How would you serve this dessert? Get creative and make it your own!
Storage and Reheating Tips
Proper storage keeps your Oreo Delight fresh and delicious:
- Refrigeration: Store leftovers in an airtight container in the fridge for up to 3 days. Keep it chilled until ready to serve.
- Freezing: While freezing isn’t ideal due to the delicate layers, you can wrap individual slices tightly in plastic wrap and freeze for up to 2 months. Thaw in the fridge overnight before serving.
Do you prefer eating this dessert freshly made or saving slices for later? Both options have their charm!
Recipe FAQs
Here are answers to common questions about making Oreo Delight:
Q: Can I halve the recipe?
Yes! Simply divide all ingredient amounts by half and use a smaller pan.
Q: What if I don’t have a food processor?
You can crush the Oreos manually using a rolling pin inside a sturdy plastic bag. It may take longer, but it works just as well.
Q: Can I skip the chilling time?
While it’s possible to serve immediately, the flavors won’t meld as beautifully. Chilling enhances the taste and sets the layers properly.
Troubleshooting Tips
Even experienced bakers run into issues sometimes. Here’s how to fix common problems:
- Soggy Crust: Ensure the crust is fully chilled before adding wet layers. Freezing briefly helps firm it up.
- Lumpy Pudding: Whisk vigorously or strain the pudding through a fine mesh sieve to remove any lumps.
- Runny Layers: Double-check that your cream cheese is softened and that you haven’t overmixed the Cool Whip.
What issue have you encountered while baking similar recipes? These tips should help you overcome any hurdles.
Conclusion
Oreo Delight is a dessert that checks all the boxes delicious, easy, and customizable. Whether you follow the recipe exactly or try one of the suggested variations, this treat is sure to become a favorite among friends and family. So, what are you waiting for? Gather your ingredients, grab a mixing bowl, and start creating layers of joy.
Print
Oreo Delight
- Total Time: 4 hours and 20 minutes
- Yield: Serves 12 1x
- Diet: Vegetarian
Ingredients
- 50 Oreo cookies: These form the base and add a delicious crunch throughout the dish.
- ½ cup unsalted butter (melted): Adds richness and helps bind the cookie crumbs together.
- 1 250 g package cream cheese (softened to room temperature): Creates a smooth, velvety layer that complements the chocolate perfectly.
- 1 cup confectioners’ sugar: Sweetens the cream cheese mixture without overpowering the other flavors.
- 2 tubs Cool Whip: Provides lightness and airiness to balance the heavier components.
- 2 packages instant chocolate pudding (4-serving packs): Brings depth and a hint of cocoa to the mix.
- 2 ½ cups 2% milk: Used to prepare the pudding and adds moisture to the layers.
Instructions
- Prepare Your Baking Dish: Begin by lining a 9” x 13” baking dish with parchment paper for easy removal later.
- Crush the Oreos: Use a food processor to finely crush 50 Oreo cookies until they resemble coarse sand. Reserve ¾ cup of these crumbs for topping.
- Make the Crust: In a mixing bowl, combine the remaining crushed Oreos with melted butter. Stir well until all the crumbs are evenly coated. Press this mixture firmly into the bottom of the prepared dish. Place the crust in the freezer for a few minutes while you work on the next step.
- Cream Cheese Layer: Beat softened cream cheese and confectioners’ sugar together until smooth. Fold in one tub of Cool Whip gently, being careful not to overmix. Spread this mixture evenly over the chilled Oreo crust. To prevent disturbing the crust, drop spoonfuls of the cream cheese mixture onto the base and spread carefully.
- Pudding Layer: In a separate bowl, whisk together the milk and instant chocolate pudding mixes. Beat for about 2 minutes until thickened. Spread this layer evenly over the cream cheese mixture.
- Final Touches: Top the pudding layer with the second tub of Cool Whip, spreading it smoothly. Sprinkle the reserved Oreo crumbs over the top for added texture and presentation.
- Chill and Serve: Refrigerate the dessert for at least 6 hours or overnight to allow the flavors to meld together. Once set, slice into squares and enjoy!
Notes
Room Temperature Cream Cheese: Softened cream cheese blends more easily and results in a smoother texture. Let it sit out for about 30 minutes before starting.
Don’t Overmix: When incorporating Cool Whip into the cream cheese mixture, fold gently to maintain its fluffiness. Overmixing can deflate the volume.
Freeze the Crust: A quick stint in the freezer helps solidify the crust, preventing it from becoming soggy once the wet layers are added.
Even Layers: Take your time spreading each layer to ensure they’re uniform, which makes cutting cleaner and more visually appealing.
- Prep Time: 20 minutes
- Category: Dessert
- Method: No-bake
- Cuisine: American
Nutrition
- Serving Size: 1/12 of the dessert
- Calories: 310 kcal
- Sugar: 34g
- Sodium: 300mg
- Fat: 12g
- Saturated Fat: 7g
- Trans Fat: 0g
- Carbohydrates: 52g
- Fiber: 0g
- Protein: 3g
- Cholesterol: 0mg