
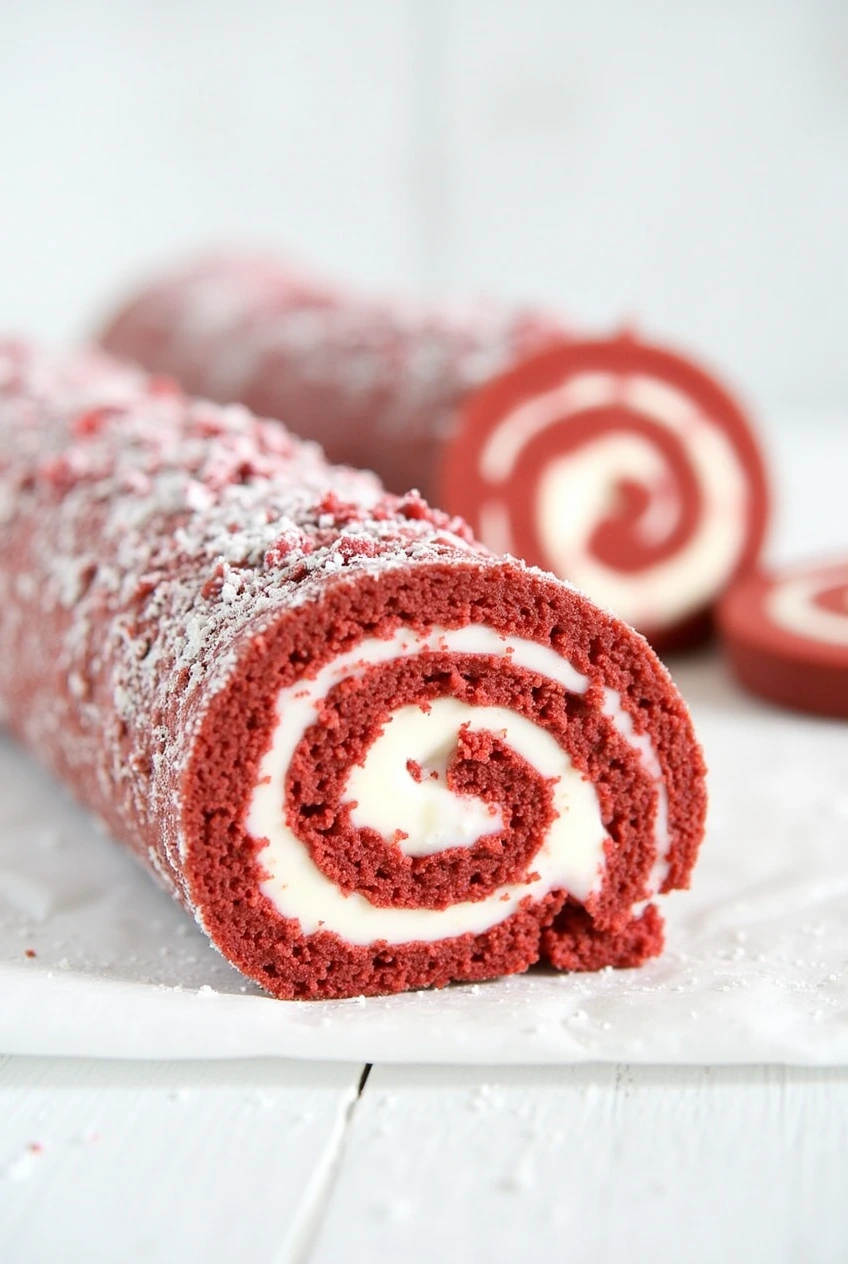
This dessert is a delightful combination of rich red velvet cake and creamy Oreo filling, all rolled up into a beautiful swirl. It’s like a party for your taste buds.
Why is this cake so popular? Well, it’s not just a feast for the eyes; it’s also a crowd-pleaser. Who can resist that bright red color and the crunch of Oreo cookies? Whether you’re celebrating a birthday or just want to impress your friends, this cake roll is sure to steal the show.
In this article, I’ll guide you through everything you need to know about making this scrumptious dessert. So grab your apron, and let’s get rolling.
What is a Red Velvet Oreo Cake Roll?
So, what exactly is a Red Velvet Oreo Cake Roll? Picture this: a soft, fluffy red velvet cake that’s lovingly spread with a rich Oreo cream filling. Then, it’s rolled up tightly like a delicious burrito of happiness.
The magic happens when you take a bite. You get the moist cake combined with the crunchy, chocolatey goodness of Oreos. It’s a mix of flavors and textures that will make your taste buds dance like nobody’s watching.
History and Origin of Red Velvet Cake
Let’s take a trip back in time to discover the roots of red velvet cake. This cake first became popular in the early 20th century, especially in the Southern United States. It was known for its unique reddish hue, which came from cocoa powder reacting with acidic ingredients like buttermilk and vinegar.
Over the years, red velvet cake has evolved from a simple dessert to a trendy favorite, with variations featuring cream cheese frosting and even chocolate chips. It’s like that classic movie that keeps getting remade but never goes out of style.
The Fusion of Red Velvet and Oreo
Now, how did we get this fabulous fusion of red velvet and Oreo? Well, as people started to experiment with flavors, they realized that Oreos could make everything better kind of like how adding sprinkles can turn a regular cupcake into a party.
This combination gained popularity in modern desserts, and it’s no wonder why. The contrasting flavors of sweet red velvet and crunchy Oreos create a delicious harmony that has captured the hearts (and stomachs) of many.
Ingredients Needed
Let’s talk about the star players in our Red Velvet Oreo Cake Roll. Here’s what you’ll need:
- All-purpose flour: This is the base of your cake.
- Cocoa powder: Adds a subtle chocolate flavor.
- Sugar: Sweetness is key!
- Eggs: They help hold everything together.
- Buttermilk: Gives the cake its moistness.
- Red food coloring: Makes it vibrant and fun!
- Vanilla extract: For that extra flavor boost.
- Oreo cookies: The delicious filling!
Each ingredient plays a special role in making this cake roll delightful. Like a team of superheroes, they come together to create something amazing.
Equipment Required
Before we dive into baking, let’s check our toolbox! Here’s what you’ll need:
- Mixing bowls: For combining our ingredients.
- Whisk: To mix everything together smoothly.
- Baking sheet: Where the magic happens in the oven!
- Parchment paper: To keep things from sticking.
- Cooling rack: So your cake can cool down after baking.
With these tools, you’ll be ready to roll (literally) and create your masterpiece.
I hope you find this guide helpful and entertaining as you embark on your Red Velvet Oreo Cake Roll adventure! Stay tuned for the next sections where we’ll dive deeper into the process and tips for success.
Step-by-Step Recipe for Red Velvet Oreo Cake Roll
Ready to create your own Red Velvet Oreo Cake Roll? Let’s get started with these easy steps!
Preparing the Cake Batter
- Preheat your oven to 350°F (175°C). This ensures your cake bakes evenly.
- In a large mixing bowl, combine 1 cup of all-purpose flour, 1 tablespoon of cocoa powder, and 1 teaspoon of baking powder. Whisk them together until they’re well mixed.
- In another bowl, cream together 1 cup of sugar and 2 eggs until light and fluffy. Add in 1 cup of buttermilk, 1 teaspoon of vanilla extract, and 2 tablespoons of red food coloring. Mix well.
- Gradually add the dry ingredients to the wet mixture, stirring gently until just combined. Don’t overmix treat it like a delicate dance.
Baking Process
- Line a baking sheet (about 15×10 inches) with parchment paper. Pour the batter onto the sheet, spreading it evenly.
- Bake in the preheated oven for 12-15 minutes, or until a toothpick inserted in the center comes out clean.
Preparing the Oreo Cream Filling
- While the cake is baking, prepare the filling. In a bowl, mix 8 oz of cream cheese (softened), ½ cup of powdered sugar, and 1 cup of crushed Oreos. Stir until smooth and creamy.
Assembling and Rolling the Cake
- Once the cake is done, remove it from the oven. Let it cool for about 5 minutes. Then, carefully flip it onto a clean kitchen towel dusted with powdered sugar. Peel off the parchment paper.
- Spread the Oreo filling evenly over the warm cake, leaving a small border around the edges.
- Starting from one end, roll the cake tightly using the towel to guide you. Keep it snug but not too tight.
- Wrap the rolled cake in plastic wrap and chill it in the refrigerator for at least 1 hour.
Chilling and Serving Suggestions
- When you’re ready to serve, slice the roll into pieces. Pair it with a scoop of vanilla ice cream or a drizzle of chocolate sauce for an extra treat.
Tips for Perfecting Your Cake Roll
To make your cake roll a showstopper, keep these tips in mind:
- Prevent Cracking: Roll the cake while it’s still warm. This helps it bend without breaking. Think of it like a yoga class for your cake.
- Achieve the Ideal Texture: Make sure not to overmix your batter. Gentle stirring is key, like cradling a baby bird.
- Decorating Ideas: Top your cake roll with whipped cream, more crushed Oreos, or even a sprinkle of edible glitter for a sparkle.
Common Mistakes to Avoid
Avoid these common pitfalls for a perfect cake roll:
- Overbaking or Underbaking: Keep an eye on the time to ensure your cake is just right. A little too much time can lead to dryness a cake tragedy.
- Improper Rolling Techniques: If you roll too tightly or too loosely, it can crack or be too floppy. Find that sweet spot.
- Incorrect Ingredient Measurements: Use a kitchen scale or measuring cups for accuracy. A pinch too much can change everything.
Variations and Substitutions
Feeling adventurous? Here are some ideas:
- Alternative Fillings: Swap out the Oreo filling for cream cheese frosting, Nutella, or even fresh berries for a fruity twist.
- Dietary Substitutions: For a gluten-free option, use almond or coconut flour. You can also use dairy-free cream cheese for a vegan treat.
Serving Suggestions
Looking to impress? Here are some serving ideas:
- Pairing with Beverages: Serve with a cup of coffee or a glass of cold milk. It’s like a match made in dessert heaven.
- Presentation Ideas: Arrange slices on a beautiful platter and garnish with mint leaves or chocolate shavings for that fancy touch.
Storing and Preserving the Cake Roll
Want to save some for later? Here’s how:
- Storage Methods: Keep your cake roll wrapped in plastic wrap or in an airtight container in the fridge.
- Shelf Life: It can last about 3-4 days in the fridge. Just remember, the sooner you eat it, the better.
Frequently Asked Questions (FAQs)
Here are some answers to common questions:
- Can I make this cake roll ahead of time? Yes! You can prepare it a day in advance and store it in the fridge.
- How do I prevent the cake from cracking when rolling? Roll it while it’s warm and use a towel to help.
- Can I use natural food coloring instead of artificial? Absolutely! Just check your brand for the right equivalent.
- What can I substitute for buttermilk? You can mix milk with a tablespoon of vinegar or lemon juice for a quick substitute.
- How should I store leftovers? Keep them in the fridge, wrapped up tight.
Conclusion
To wrap it all up, the Red Velvet Oreo Cake Roll is not just a dessert; it’s an experience! With its vibrant colors and delightful flavors, it’s perfect for any occasion. So, why not give it a try at home? I promise, you’ll impress everyone and maybe even yourself! Happy baking.
Print
Red Velvet Oreo Cake Roll
Ingredients
- For the Cake
- 1 cup all-purpose flour
- 1 tablespoon cocoa powder
- 1 teaspoon baking powder
- 1 cup sugar
- 2 eggs
- 1 cup buttermilk
- 1 teaspoon vanilla extract
- 2 tablespoons red food coloring
- For the Filling
- 8 oz cream cheese (softened)
- ½ cup powdered sugar
- 1 cup crushed Oreo cookies
Instructions
- Preparing the Cake Batter
- Preheat oven to 350°F (175°C).
- In a large bowl, whisk together flour, cocoa powder, and baking powder.
- In another bowl, cream sugar and eggs until light and fluffy.
- Add buttermilk, vanilla extract, and red food coloring to the wet mixture and mix well.
- Gradually combine dry ingredients with the wet mixture, stirring gently until just combined. Avoid overmixing.
- Baking the Cake
- Line a 15×10-inch baking sheet with parchment paper.
- Pour the batter onto the sheet and spread evenly.
- Bake for 12-15 minutes, or until a toothpick inserted in the center comes out clean.
- Preparing the Oreo Cream Filling
- Mix softened cream cheese, powdered sugar, and crushed Oreos until smooth and creamy.
- Assembling and Rolling
- Remove the cake from the oven and let it cool for 5 minutes.
- Flip the cake onto a powdered sugar-dusted kitchen towel.
- Peel off the parchment paper. Spread Oreo filling evenly over the cake, leaving a small border.
- Roll the cake tightly from one end, using the towel to guide you. Wrap in plastic wrap and refrigerate for at least 1 hour.
- Serving Suggestions
- Slice and serve with vanilla ice cream or a drizzle of chocolate sauce.
Notes
- Texture Tips
- Prevent cracks by rolling the cake while warm.
- Avoid overmixing to achieve a tender texture.
- Decoration Ideas
- Garnish with whipped cream, crushed Oreos, or edible glitter.
- Storage and Shelf Life
- Store in an airtight container in the refrigerator for 3-4 days.